hoisin chicken with green beans and sticky rice

I’ve been thinking a lot about this guy lately.

DSC_6764 - Version 2

He’s starting at a new school this fall and will experience all kinds of change during this time called adolescence and junior high. It’s brought back all kinds of memories from my own adolescent years – everything from remembering locker combinations to who to sit by at lunch to what to wear. Ugh. I know he’ll do great, but it’s so hard to be a parent and go through all these transitions again with your kids. Especially when the transitions and years seem to be passing at lightning speed. I still think of him as a toddler some days, and long for cuddling with him, reading him bedtime stories, or playing dinosaurs and trains. He has been known on occasion to hover over my shoulder and listen when I’m reading a picture book to my youngest. I love that.

School starts in one day, and I’m about as ready as I’ll ever be. Back-to-school for us means busy evenings with homework and sports. My head is spinning thinking about managing our schedules, as I’m sure many others can relate.

Need a quick dinner recipe? This one’s so very simple and easy to throw together. Great for those nights when you feel like Chinese takeout, but prefer to make it yourself. It’s complete with protein and veggie and is easily customized with your favorite substitutes, i.e. shrimp, peppers, beef, broccoli, etc.

My version, which I sort of tossed together with whatever we had in our refrigerator, turned out to be a keeper. I like to serve this with a sticky rice, which is Jasmine rice, rinsed until the water runs clear and made in a rice cooker. All while you prepare the main event. Everything is ready to serve in less than 30 minutes. Feel free to add additional sides like potstickers, cream cheese wontons or egg rolls, or to keep it healthy – more sauteed veggies. An after-dinner lucky fortune cookie doesn’t hurt either.

photo 2 (3)

Hoisin Chicken with Green Beans and Sticky Rice

2 tablespoons canola oil
1 1/2 lbs. chicken thighs, cut into bite-size pieces
2-3 garlic cloves, minced
2 cups fresh green beans, ends trimmed
1 cup fresh mushrooms, cut in half
2-3 tablespoons hoisin sauce
Few dashes of tamari

Heat oil in wok or large skillet over med-high heat. Add chicken and stir fry for 5-7 minutes, until no longer pink. Add garlic and continue to stir fry until fragrant. Add green beans and mushrooms and continue to stir fry until green beans start to wrinkle and vegetables become tender. Add hoisin sauce and a couple dashes of tamari and stir to combine. Serve with sticky rice and soy sauce.

Enjoy!

A little fact about me – I’m fascinated by dinosaurs and have been known to name all of them in our collection. Pterodactyls, Tyrannosaurus Rex, Stegosaurus, Brachiosaurus, Bronchosaurus, Triceratops, etc… Do you know yours? Happy back-to-school, crazy schedules and all!

a meat-less asian saute – gone totally right

Well, hello there! I’ve been gone for a while. Still cooking like crazy, but most posts have remained in the drafts folder. I’m hoping to get a few quiet moments more regularly, but most days, it’s just pure busy around the house. Wake up, get ready, work, leave work, pickup kids, do the homework/dinner scramble, leave for activities (often conflicting and in opposite locations), watch activities, return, showers/baths, book time, kids bedtime, and often I’m the next in line. Repeat. If I’m really good, I manage to get myself on the treadmill in the morning.  That’s the usual “during the week schedule” for us.

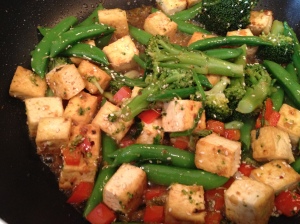
I’ve dabbled in the past cooking with tofu, and most times, I’ve been disappointed with the results. Not this time. This recipe is fantastic, and could easily be swapped out with various meats, if you wish. The sauce fills in the flavorless void of the tofu, and the vegetables are just the right addition.

The key to this dish is making sure the tofu is completely drained of excess moisture. Also, having patience, the right level of heat, and not disturbing the saute pan yields golden-brown, crispy tofu perfection. Try it for yourself, and you may enjoy just as much as I did … Another bonus? My kids were convinced they were eating chicken. Perfect for a Meatless Monday, or any day of the week.

tofu1

Hot and Sour Seared Tofu With Sugar Snap Peas (and Red Pepper)
Adapted from NY Times
2-3 servings

1 14-ounce package extra-firm tofu (and drained well)
4 garlic cloves, crushed
2 small jalapeño chiles, chopped
1 1/2 tablespoons soy sauce (use tamari for gluten free version)
1 1/2 teaspoons grated ginger
1 1/2 tablespoons lime juice
1 1/2 teaspoons toasted sesame oil
1 1/2 teaspoons Asian fish sauce
1 teaspoon honey
2 tablespoons peanut oil, more if needed
6 ounces sugar snap peas, trimmed and thinly sliced (I’ve also made with haricots verts/green beans, broccoli or whatever vegetable you choose)
1/2 red pepper, diced
3 scallions, thinly sliced
Crushed red pepper, as desired
Sesame seeds, as desired
May garnish with chopped cilantro or basil.

Drain tofu well, wrap it with a clean dish towel or several layers of paper towels and place on a rimmed plate; top with another plate and some extra weight. Let drain further. (This step is key to golden brown perfection.)

To make the sauce, combine garlic, chiles, soy sauce, ginger, lime juice, sesame oil, fish sauce and honey in a small bowl. Unwrap tofu and cut crosswise into 3/4-inch-thick slices. Pat slices dry. Heat a large skillet over high heat until hot. Add peanut oil and let heat for 30 seconds, then carefully add tofu. Don’t touch tofu for 2 to 3 minutes, letting it sear until golden brown. Flip and sear for another 2 to 3 minutes.

Move tofu to one side of pan (or temporarily remove from pan and keep warm). Add vegetables and, if needed, a few drops more peanut oil. Stir-fry vegetables for a couple of minutes, being careful not to overcook them. Add sauce and stir well, cooking until vegetables are done to taste, 1-2 minutes. Return tofu to pan and coat with sauce. Sprinkle sesame seeds over tofu and vegetables. Can also garnish with cilantro or basil, if you wish.

Serve with cooked jasmine or brown rice. Enjoy!

tofu2

tastes of spring and summer in january

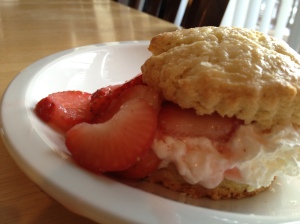
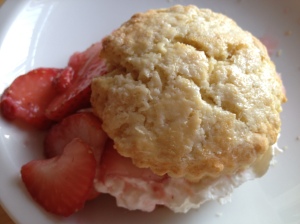
During the coldest month of the year, I often long for spring and summer, and the tastes that come with the seasons. This recipe makes me smile because growing up, we had a constant debate over which was better. Strawberry shortcake or angel food cake with strawberries. My dad preferred the strawberry shortcake (or the dry biscuits, as we called them), while the rest of us loved the light, airy sponge of angel food cake. Twenty some years later, I’ve decided to give the “biscuit” version another try.

I have to say I was very pleased!  And, a few others didn’t think these were too shabby, either.  This recipe could easily be substituted with any fruit, ie. blackberries, mangoes, blueberries, peaches. Mmm. I baked my biscuits ahead of time and warmed them up prior to serving. 

iphonejanuary 2013 054

iphonejanuary 2013 072

This one, not so much.  Or, at least she’s giving it some thought.  Maybe next time.

iphonejanuary 2013 063

This recipe’s for you, Dad. Enjoy.

iphonejanuary 2013 068

Classic Strawberry Shortcake
adapted from Fine Cooking

Strawberry Topping
1 lb. ripe strawberries, hulled (about 4 cups)
2 Tbs. granulated sugar; more to taste

Biscuits
9 oz. (2 cups) unbleached all-purpose flour; more for rolling
1/3 cup plus 1 Tbs. granulated sugar
2-1/2 tsp. baking powder
1/4 tsp. baking soda
1/2 tsp. kosher salt
4 oz. (1/2 cup) cold unsalted butter, cut into 1/2-inch pieces
1 large egg
1/4 cup heavy cream; more for brushing
1/4 cup buttermilk

Whipped Cream
1-1/2 cups heavy cream
2 Tbs. granulated sugar
Prepare the strawberries
Put one-third of the berries in a medium bowl and, using a potato masher, crush them into a chunky purée. Slice the remaining berries 1/4 inch thick and stir them into the mashed berries along with the sugar. Taste the berries, adding more sugar if necessary. Let the berries sit at room temperature for at least 30 minutes.

Make the biscuits
Position a rack in the center of the oven and heat the oven to 425°F. Line a large heavy-duty baking sheet with parchment.

Sift the flour, 1/3 cup of the sugar, the baking powder, and baking soda into a large bowl.  (I don’t have a flour sifter, so I improvise.)  Stir in the salt.

iphonejanuary 2013 050

Using a pastry blender, a fork, or your fingertips, work the butter into the dry ingredients until the mixture resembles coarse cornmeal.

In a small bowl, beat the egg and heavy cream with a fork. Mix in the buttermilk. Make a well in the center of the flour mixture and pour in the cream mixture. Mix with the fork until the dough is evenly moistened and just comes together; it will still look a little shaggy. Gather the dough and gently knead it three or four times. If the dough seems dry and doesn’t form a cohesive mass, work in more cream, 1 tsp. at a time.

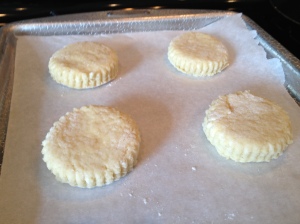
Transfer the dough to a lightly floured surface and roll it into a 3/4 -inch-thick disk. With a sharp 2 1/2-inch biscuit cutter, press straight down to cut the dough into rounds and lift straight up to remove (don’t twist the cutter or it will seal the sides of the biscuits and interfere with rising). Transfer the rounds to the prepared baking sheet. Gather the dough scraps, gently knead them together, re-roll, and cut out more biscuits until you have a total of 6.

iphonejanuary 2013 051

iphonejanuary 2013 052

Lightly brush the biscuit tops with cream (about 1 Tbs.) and sprinkle with the remaining 1 Tbs. sugar. Bake, rotating the baking sheet once, until the biscuit tops are lightly browned, 10 to 15 minutes.

iphonejanuary 2013 053

Let the biscuits cool slightly while you whip the cream.

Whip the cream
In a large, chilled metal bowl, whip the heavy cream and sugar to soft peaks with an electric hand mixer. (Use immediately or refrigerate, covered until ready to serve).

Assemble the shortcakes
Using a serrated knife, split the warm biscuits in half horizontally and transfer the bottoms to 6 dessert plates. Spoon about three-quarters of the macerated berries and their juice evenly over the biscuit bottoms. It’s OK if some of the berries spill out onto the plate. Top with a generous dollop of whipped cream and cover each with a biscuit top. Spoon more berries and cream over each shortcake and serve immediately.  Enjoy!

iphonejanuary 2013 069iphonejanuary 2013 070

cauliflower steaks with jalapeno corn relish

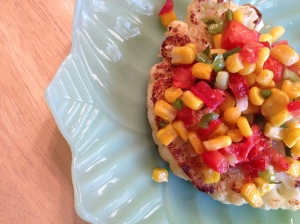
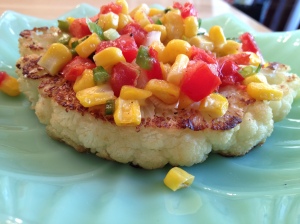
Inspired by a similar Food & Wine recipe, and motivated to reduce the amount of red meat from our diet, here’s a steak recipe that proves to be hearty, healthy, and meatless.  This one caught my eye, as we love to make roasted cauliflower as a side for many of our meals.  But, why not make it the main event?  A vegetable topped with more vegetables, and a little spicy heat – brilliant as a main course.

iphone december 2012 055

Slicing the head of cauliflower into 3/4 inch steaks was a little tricky with the size I had, but I worked with it anyways.  And, it’s prepared very similar to a real steak.  Hot skillet (add a little canola oil and salt and pepper), sear/brown each side for about 3 minutes, or until nicely browned.  Roast for about 20 minutes.

Yum.  I hope you enjoy this as much as we did!

iphone december 2012 054

Cauliflower Steaks with Jalapeno Corn Relish

inspired by this Food & Wine recipe

2 large heads of cauliflower, stems lightly trimmed
1 1/2 cups corn (fresh or frozen)
1/4 cup vegetable oil
1 fresh jalapeno, seeded and minced
4 scallions, chopped
1 medium tomato, diced and drained
salt and pepper

Preheat the oven to 375°. Cut three 3/4-inch-thick center slices from each head of cauliflower to form “steaks.” Use the rest of the cauliflower for something else.

In a medium skillet, heat 2 tablespoons of the oil. Add the jalapeno and cook over moderately high heat for 30 seconds. Add the scallions and cook until softened, about 1 minute. Stir in the corn and tomato and season with salt and pepper.

In a large, nonstick skillet, heat 1 tablespoon of the oil until shimmering. Add 3 cauliflower steaks and season with salt and pepper. Cook over moderate heat until lightly browned, about 3 minutes per side; transfer to a large baking pan. Repeat with the remaining 1 tablespoon of oil and 3 cauliflower steaks.

Press the jalapeno-corn relish into the spaces between the cauliflower florets. Bake the cauliflower steaks for 25 minutes, until tender and richly browned. Top with additional relish, if desired.  Enjoy!

black bottom cupcakes

Love these cupcakes!  And, so do the kids.  So rich and decadent.  The chocolate pairs perfectly with the cheesecake-like centers.  And chocolate frosting tops it off.  Enjoy!

Black Bottom Cupcakes
Adapted from Taste of Home

ipone fallwinter2012 109

FILLING:
1 package (8 ounces) cream cheese, softened
1/3 cup sugar
1 egg
1/8 teaspoon salt
1 cup (6 ounces) semisweet chocolate chips

CUPCAKES:
1 cup sugar
1 cup water
1/3 cup vegetable oil
1 egg
1 tablespoon white vinegar
1 teaspoon vanilla extract
1-1/2 cups all-purpose flour
1/4 cup baking cocoa
1 teaspoon baking soda
1/2 teaspoon salt

In a small bowl, beat the cream cheese, sugar, egg and salt until smooth. Stir in chips; set aside.

For cupcakes, in a large bowl, beat the sugar, water, oil, egg, vinegar and vanilla until well blended. Combine the flour, cocoa, baking soda and salt; gradually beat into egg mixture until blended.

Fill paper-lined muffin cups half full with chocolate batter. Drop a heaping teaspoonful of cheese mixture in center of batter of each cupcake.

Bake at 350° for 25 minutes. Cool in pans for 10 minutes before removing to racks to cool completely.

ipone fallwinter2012 111

I topped the cupcakes with a rich, chocolate espresso frosting. Could also use a prepared chocolate frosting, but this way, I was able to have lots of leftovers!  Store cupcakes in refrigerator.

ipone fallwinter2012 110

Yield: 20-24 cupcakes.  Enjoy!

puzzles and pancakes in our pajamas

Lazy Saturday mornings are the BEST! We usually brew an extra-large pot of coffee, hang out in our pj’s and lounge. And, sometimes, we don’t get out of our pajamas until late afternoon!

We finished two large puzzles over the holidays.  A 500-piece puzzle of Santa Claus and a 750-piece puzzle of Rockefeller Center decorated for the holidays.  Rockefeller Center was full of people, skating, spectating, and snow falling.  And, the pieces were small, and irregular shaped.  This one took us almost two weeks, and often, we just had to walk away from the table until the next day.  A new day and a new perspective. Pieces were everywhere – all over the kitchen table.   For those two weeks, we ended up setting our table on top of the puzzle.  Oh well, if our table wasn’t covered in puzzle, it would be marker or art projects or homework or crumbs.  I love a good puzzle. Great family time, and everyone can help. Great conversation, relaxation, and a great challenge.  Here’s one of our finished masterpieces…

217

I had some canned pumpkin left in the fridge, so I whipped up a batch of Martha Stewart’s pumpkin pancakes. Love the spice and the fluffy, moist cakes. I would definitely make them again.

Pumpkin Pancakes
adapted from Martha Stewart

Whisk 1 1/4 cups all-purpose flour; 2 tablespoons sugar; 2 teaspoons baking powder; 1/2 teaspoon each cinnamon, ground ginger, and salt; 1/8 teaspoon nutmeg; and a pinch of ground cloves.

In a separate bowl, stir together 1 cup milk, 6 tablespoons canned pumpkin puree, 2 tablespoons melted butter, and 1 egg; fold mixture into dry ingredients.

Melt some butter in a skillet over medium heat; pour in 1/4 cup batter for each pancake. Cook pancakes about 3 minutes per side; serve with butter and syrup. (I served mine with butter, powdered sugar and whipped cream since I’m not a fan of maple syrup.) Makes 8 to 10.  Enjoy!

elegance absent and dessert (or breakfast)

I love to cook and be in the kitchen, but I have to admit… I am not an elegant cook or baker. (Ina Garten is my personal favorite.) (And yes, she probably has a supportive team behind the scenes helping to make sure everything looks just right for the camera.) You know the kind. So calm and camera ready, always with great stories of entertaining and lively connections with food. The ones who wear aprons and never get them full of flour or grease. The ones who have mise en place mastered, with everything ready and at the tip of their fingers. The ones who have a spotless kitchen, organized cupboards and countertops clear of clutter.

Nope, that’s not me! As much as I strive to be, my husband will be the first to admit that I am more chaos than elegance in the kitchen. But, I am ok with that. It’s how I roll. My iPhone gets full of flour as I’m searching for recipes, my batter sometimes flies across the room and often, I am pushing my piles of paper aside to make room for cooking. However, I do have support in the kitchen. My husband, who washes the countless dishes that I dirty in my cooking adventures. Or, who picks up the kitchen and countertops in the midst of my chaos. My kids, who love to taste and see. It’s all good!

A new year and new year’s resolutions for 2013.

image

A simple list – Be healthy.  Be happy.  Be thankful.  And, a new dessert recipe for the family, which uh… incorporates all three resolutions. Be healthy (well, not so much with this recipe. Although, chocolate does have some healthy qualities.) Be happy – always…with family and chocolate. Be thankful – for good dessert, and seconds.  King Arthur Flour’s Fudge Waffles with Ice Cream and Chocolate Sauce.  I’ve swapped the words in the recipe to call it Chocolate Waffles with Ice Cream and Chocolate Fudge, which fits better with the end product.  A chocolatey waffle dotted with semisweet chocolate chips, topped with vanilla ice cream and drizzled with chocolate fudge sauce.  Amazing.  My favorite part of the recipe is the fudge sauce.  Served warm, it’s runny and easy to drizzle –  more like Hershey’s chocolate syrup, but once on top of the ice cream, the sauce thickens to a fudge consistency.  So delicious! I could seriously eat it by the spoonfuls right out of the refrigerator.

The kids loved this dessert. Thank you King Arthur Flour!  What’s not to love?  Chocolate waffles?!  Breakfast for dessert?!  Chocolate and Fudge?!  Ice cream and waffles?!  We did have some leftovers, so we served up some chocolate waffles for breakfast the next morning.

ipone fallwinter2012 287

Chocolate Waffles with Ice Cream and Chocolate Fudge
adapted from King Arthur Flour’s recipe

2 eggs, room temperature
1/2 stick butter, melted and cooled
1 teaspoon vanilla
1 cup buttermilk (I substituted with 1 cup of milk and 1 tbsp lemon juice.)
1 cup flour
3/4 cup sugar
1/2 cup unsweetened cocoa powder
1/2 teaspoon baking powder
1/2 teaspoon baking soda
1/4 teaspoon salt
1/4 teaspoon nutmeg
1/2 cup chocolate chips

In a large mixing bowl, combine eggs, butter and vanilla, and beat until light, about 2 minutes. Blend in buttermilk, then flour, sugar, cocoa, baking powder, baking soda, salt and nutmeg. Gently fold in chocolate chips.

ipone fallwinter2012 279

Bake waffles in a preheated well-greased waffle iron until done (following directions for your own waffle iron). Serve with the ice cream of your choice and chocolate sauce (recipe follows). Waffles can be served immediately, or wrapped in plastic wrap and served the next day. Warm them in a toaster oven if you wish.

ipone fallwinter2012 278

Chocolate Fudge Sauce

1/2 cup granulated sugar
1/4 cup unsweetened cocoa powder
1/2 cup light corn syrup
1/4 cup half-and-half or evaporated milk
2 tablespoons butter or margarine
1/2 teaspoon vanilla

In a small saucepan, combine sugar, cocoa powder, corn syrup and milk or half-and-half. Stir to blend. Cook over medium heat until mixture comes to a full boil, then reduce heat to medium-low and simmer, stirring occasionally, for 3 minutes. Remove sauce from heat and add butter and vanilla, stirring until butter melts. Cool to room temperature, then store in the refrigerator.
Makes about 1 cup.

Serve warm or at room temperature; this sauce reheats easily in a glass cup in your microwave.

Enjoy!

heirloom tomato summer salad

I’ve had such great luck with my two patio heirloom tomato plants this summer.  A bounty of green zebras and beefsteaks have resulted in many sliced tomatoes generously sprinkled with sea salt and cracked pepper, blt’s, homemade salsa, and this wonderful tomato salad.

I was able to get an abundance of cherry tomatoes from a friend, so I halved them and tossed them with sliced green zebras, fresh mint, shallots, olive oil, champagne vinegar and salt/pepper. Yum. The addition of mint is just perfect.

Heirloom Tomato Salad

A pint of cherry tomatoes, halved
2-3 green zebra tomatoes, sliced
1 shallot, chopped
4-5 fresh mint leaves, cut into thin strips (could also work with basil leaves, and maybe addition of bacon or feta cheese)

Olive oil, to taste (1-2 tbsp)
Champagne vinegar, to taste (1-2 tbsp)
Salt/pepper, to taste

Carefully fold tomatoes, shallot and mint together in medium bowl and toss with olive oil, champagne vinegar and salt/pepper. Chill, serve and enjoy! 

busy schedules, life and asian chicken

I’m back, after a much necessary break. Life happens, and so does the reality of busy schedules!  In early April, my family visited my sister Whitney, in Austin, Texas! Left Minneapolis at 6 am and drove straight through to Austin. 19+ hours in the car, all 6 of us! We had a blast! Lots of road food and convenience store snacks on the way down, but lots of amazing food in Austin – Shipley’s Donuts (a donut shop way too close to my sister’s place), Kebabalicious (an amazing food truck serving falafel, chicken shawarma, etc.), Chuy’s (a Mexican restaurant), Moonshine (a great night out with my sisters and husband), and many others. The end of April marked the beginning of summer sports, and three colliding schedules. Oh, and a coaching husband. April and May were pretty much a blur.

In June, I visited my sister Kortney in California for a shopping, eating and dining trip. We indulged in amazing foie gras just weeks before a state-wide ban for restaurants. So fortunate to have been one of the last to have this and other amazing dishes at a quaint, French restaurant on Balboa Island in Newport Beach called Basilic. We also visited Palm Springs for a day/evening during Restaurant Week. Amazing place. Must go back with my husband! We had amazing Mexican food and margaritas at a place called Las Casuelas Terraza. Dinner at a place called Zin American Bistro – yum. And, brunch at the Ace Hotel / King’s Highway. Great food and gorgeous drinks. Kortney and her boyfriend visited Minneapolis the following weekend, and we cooked at home and dined at a local place called the Little River Inn and Bar. We also celebrated my brother and sister-in-law’s wedding in June. Busy and fun times!

In late June and early July we traveled back to Bismarck, ND for my husband’s 20 year class reunion and a week’s vacation over the Fourth of July. And, in August, celebrated a family reunion with amazing cousins from California, Kansas, Texas, North Dakota and Minnesota. It’s been a great summer spending time with family and friends, hanging out in the backyard with amazing neighbors, enjoying my patio heirloom tomatoes and fresh herbs, and creating wonderful meals at home.

September means back to school month, and a search for quick fix, easy dinner ideas…

Here’s a great healthy, Asian recipe I adapted from Martha Stewart’s Everyday Food General Tso’s Chicken. A hit for us and the kids too! Love the light (almost non-existent) batter of the pan-fried chicken, combined with chopped veggies and tossed in a slightly sweet, touch of heat sauce. We added red and green pepper, sugar snap peas and green onions.

Asian Chicken / Healthy General Tso’s Chicken
Adapted from Martha Stewart’s Everyday Food
Serves 4

1 1/4 cups long-grain brown or jasmine rice – (We made our own fried rice.)
1/4 cup cornstarch
1 pound snow peas, trimmed and halved crosswise
1/4 red pepper, chopped
1/4 green pepper, chopped
4 garlic cloves, chopped
2 teaspoons fresh ginger, grated and peeled
3 tablespoons light-brown sugar
2 tablespoons soy sauce
1/2 teaspoon red-pepper flakes
2 large egg whites
Coarse salt and ground pepper
1 pound boneless, skinless chicken breasts, cut into 1-inch pieces
2 tablespoons vegetable oil, such as safflower (we used canola oil)

Cook rice according to package instructions. Meanwhile, in a large bowl, stir together 1 tablespoon cornstarch and 1/2 cup cold water until smooth. Add vegetables, garlic, ginger, sugar, soy sauce, and red-pepper flakes; toss to combine, and set aside.

In another bowl, whisk together egg whites, remaining 3 tablespoons cornstarch, 1/2 teaspoon salt, and 1/4 teaspoon pepper. Add chicken, and toss to coat.

In a large nonstick skillet, heat 1 tablespoon oil over medium-high. Lift half the chicken from egg-white mixture (shaking off excess), and add to skillet. Cook, turning occasionally, until golden, 6 to 8 minutes. Transfer to a plate; repeat with remaining oil and chicken, and set aside (reserve skillet).

Add vegetable mixture to skillet. Cover; cook until snow peas are tender and sauce has thickened, 3 to 5 minutes. Return chicken to skillet (with any juices); toss to coat. Serve with rice.

Enjoy!!

mixed-berry dutch baby

A Dutch Baby pancake, a German pancake, a Bismarck or a Dutch puff – never mind what you call it, it’s a nice change from our regular Sunday morning pancake ritual.

Interesting how the dutch baby puffs up and browns inside the cast iron skillet. Be careful not to peek inside the oven too many times or your dutch baby may collapse prematurely. The result is a puffed pancake, browned and a bit crispy on the bottom and the edges – similar to a fresh popover or Yorkshire pudding.

The berries and a light sprinkle of powdered sugar perfects this dish with just the right amount of tart and sweet. This dish is surprisingly light, but also very filling. Also, don’t be surprised…it does collapse shortly after you remove the skillet from the oven.

Mixed-Berry Dutch Baby
Adapted from Food & Wine / Grace Parisi
Serves 6-8

3 large eggs
1/2 teaspoon finely grated lemon zest
1/3 cup sugar
Pinch of salt
2/3 cup all-purpose flour
2/3 cup milk
2 cups raspberries
2 cups blackberries
4 tablespoons unsalted butter
Confectioners’ sugar, for dusting

Preheat the oven to 425° and heat a 10-inch cast-iron skillet over moderate heat. In a medium bowl, whisk the eggs with the finely grated lemon zest, sugar and salt until combined. Add the flour and milk and whisk until smooth. Add 1 cup each of the raspberries and blackberries.

Melt the butter in the skillet and add the batter, spreading the fruit evenly. Bake in the center of the oven for about 22 minutes, until the edges are browned and puffed and the center is lightly browned in spots. Transfer the skillet to a trivet and dust the Dutch Baby with confectioners’ sugar. Cut into wedges and serve with the remaining fresh berries.

Enjoy!